Category Archives: Toolbox
Hold It Right There!
Have you ever been in a museum and seen a beautiful, delicate piece of sculpture, or a statue, that you could walk right up to and examine closely? I always think museum curators and guards must hold their breath when people get rather close to priceless art, like this…

Image courtesy of the New York Times
Have you ever had a delicate item of art or a family heirloom in your home that you want to display, but that you worry may get knocked over, broken and/or destroyed? You want to enjoy the piece (otherwise, what is the point of keeping it around?), but you worry that the “enjoying” might put the piece in danger. Maybe you have pets, kids, slightly less responsible roommates, or you live in an earthquake zone?

Image courtesy of csmonitor.com
You and the museum curators have the same kind of problem. How do you secure your item of loveliness enough to leave it out to be enjoyed, without bolting it down to the point where it can’t be enjoyed?
Museum managers have a secret weapon. My clients use it, too. Now I’m going to share the secret with you. It looks like this:

Linked image courtesy of amazon.com
This is called “Museum Putty”. It is a neutral, cream-colored putty that comes in a simple envelope. It only costs $5. You can use it, re-use it, stick it to anything and it will hold that thing DOWN.
Here’s what it looks like coming out of the package:

It’s like the texture of Silly Putty, except, shinier. It also won’t pick up the texture of whatever item you stick it to the way Silly Putty does.
I’m going to apply the putty to a little ceramic box I keep out on a table at home. I’ll just tack a little Museum Putty to the underside of the box…

…then press the putty side down gently where I want the box to live.

If I ever need to move the frame, to dust or re-arrange things, the putty leaves no marks or residue on the hard surface or the art object. Here’s the clean surface:

You can even take the putty off of one item, re-form it, then use it on a completely different item and get the same strength. If you aren’t so sure about the putty color, there is another version of this putty in a clear gel form. This version is ideal for sticking down glass or crystal items without being noticeable. It looks like this…

Linked image courtesy of amazon.com
…and is only $10. $10 is a great bargain when you think about how irreplaceable sentimental items can be. Is this something you could use in your home?
As always, I am not paid or perked for mentioning a great item on this blog. I only recommend what I like, because I like the freedom to be honest about any product I choose to mention. I use this stuff in my home and several of my clients swear by it, too. Who doesn’t like a real-life tip for avoiding household accidents? None of us want to have this kind of nightmare…

Image courtesy of tvtropes.org
Coming Tomorrow: Decor Items Fit For A Queen!
If I had a hammer…
Today’s Toolbox post tackles one of the most important tools we can have in our home toolbox: a hammer.
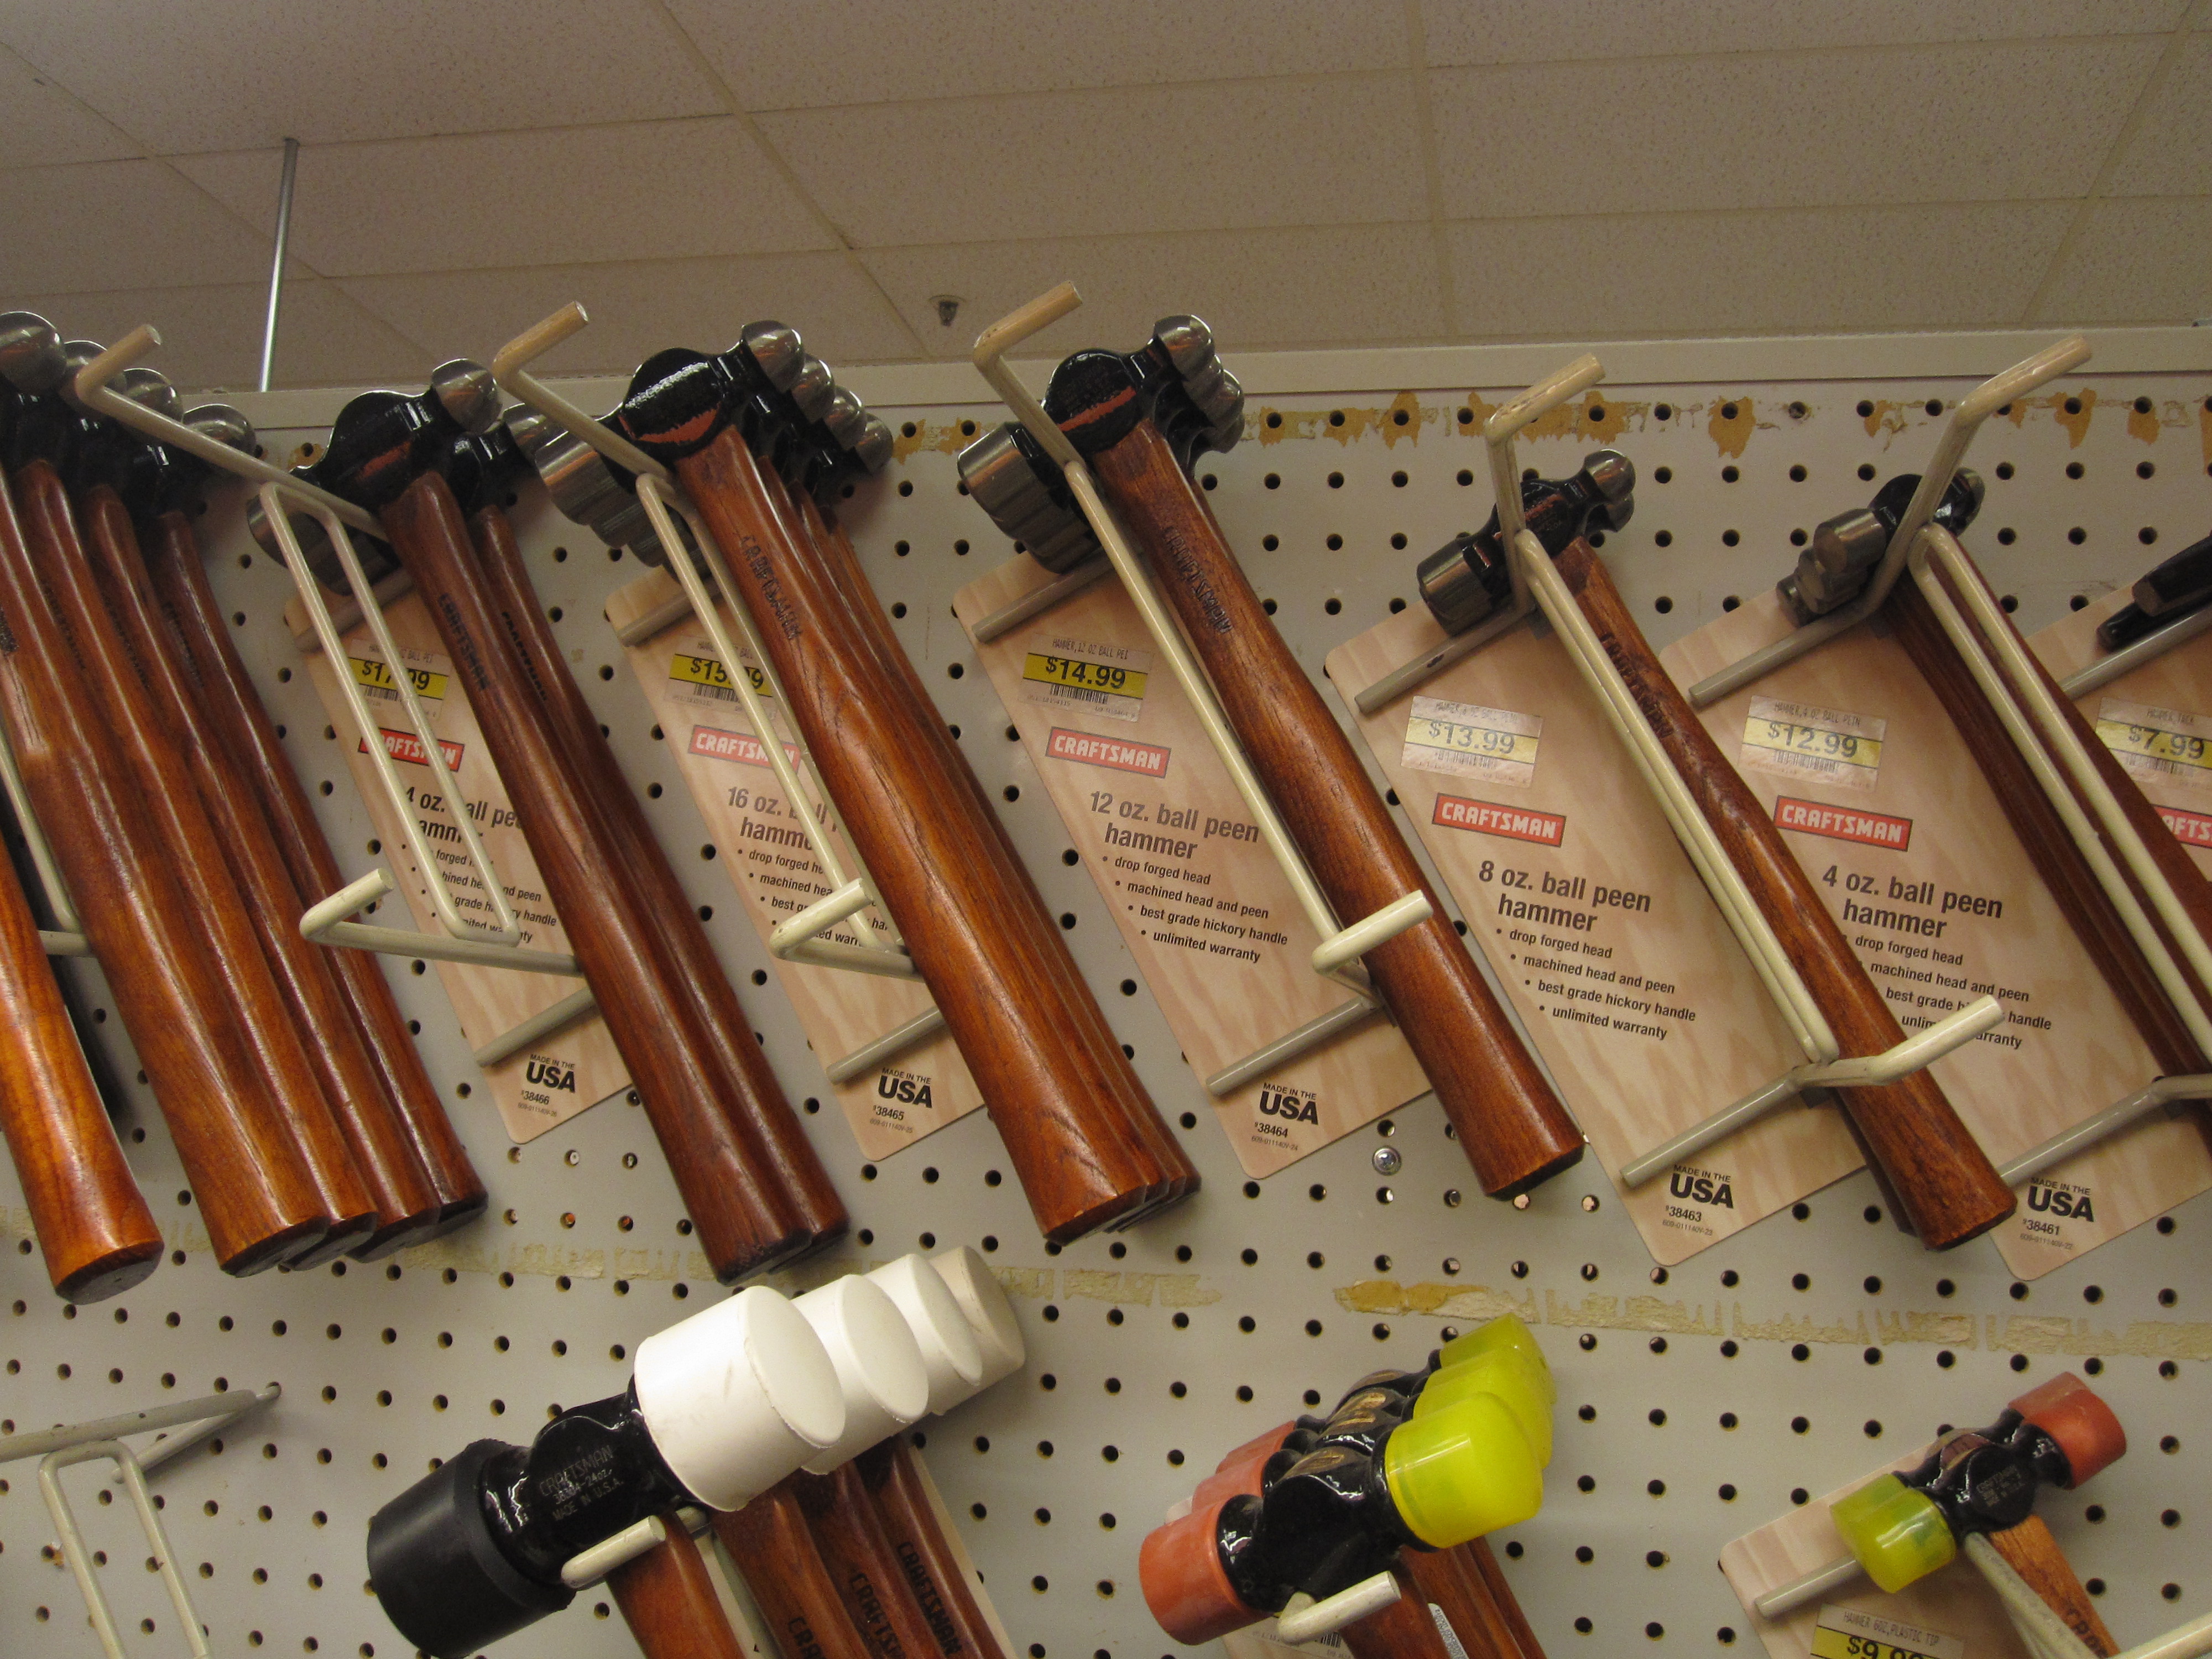
It can be very intimidating to pick out a hammer in a hardware store. There are so many choices…

To make sense of all of the choices, we’re first going to look at how a hammer works.
What You Need
There are 3 things you need in a good hammer. They are:
- a smooth striking area
- a good claw
- a sturdy handle.
Let’s look at these individually so we understand what they are:

The striking surface is the round area on the head of the hammer that hits the nail directly. Some hammers, for other specific jobs, have textured or differently shaped striking surfaced. For basic home repairs, we want a smooth, clean and round hammer head so that it connects firmly with a nail.

The claw is on the opposite side of the hammer head from the striking area and is used for removing a nail. To remove a nail, you turn the hammer upside down and simply slide the split of the claw under the nail…

…and then, gently rock the handle back and forth, away from and towards the wall, as the claw lifts the nail out.

Finally, a good hammer must have a good a sturdy handle. It can be wood or metal, with or without a rubber grip, but it must fit nicely in your hand. This is essential to using a hammer well and getting the most from the torque.
To understand “torque”, let’s take a minute and read a past post that explains how to use the hammer properly. You don’t buy a car without knowing how to drive. For exactly the same reasons, you should know how to use a hammer before you buy one:
How to swing a hammer properly
All done reading? Then let’s go to the store and pick out a hammer!
Buying A Hammer
When you are at the hardware store looking at a selection of hammers, you will now notice how the shape of the hammer can tell you how it is used. For example:

This is a tack hammer. It is used for putting short tacks down into things, such as carpet. Tacks are short and have big nail heads on them, so the hammer head has been re-shaped to give the most effective delivery of the torque to the tack. The claw (on the top right of the hammer head picture above) has also been re-shaped to fit the unique shape of the tacks themselves.
 This is a drywall hammer, used to nail the drywall to the wood studs before the seams/joints of the drywall are covered over with heavy paste known as joint compound.
This is a roofing hammer. The striking surface is textured and the claw has once again been re-shaped to allow it to reach up under roof shingles.
While you are browsing hammers, you may also find a large selection of “ball peen” hammers.
Instead of a claw, these hammers have a ball head that looks like this:
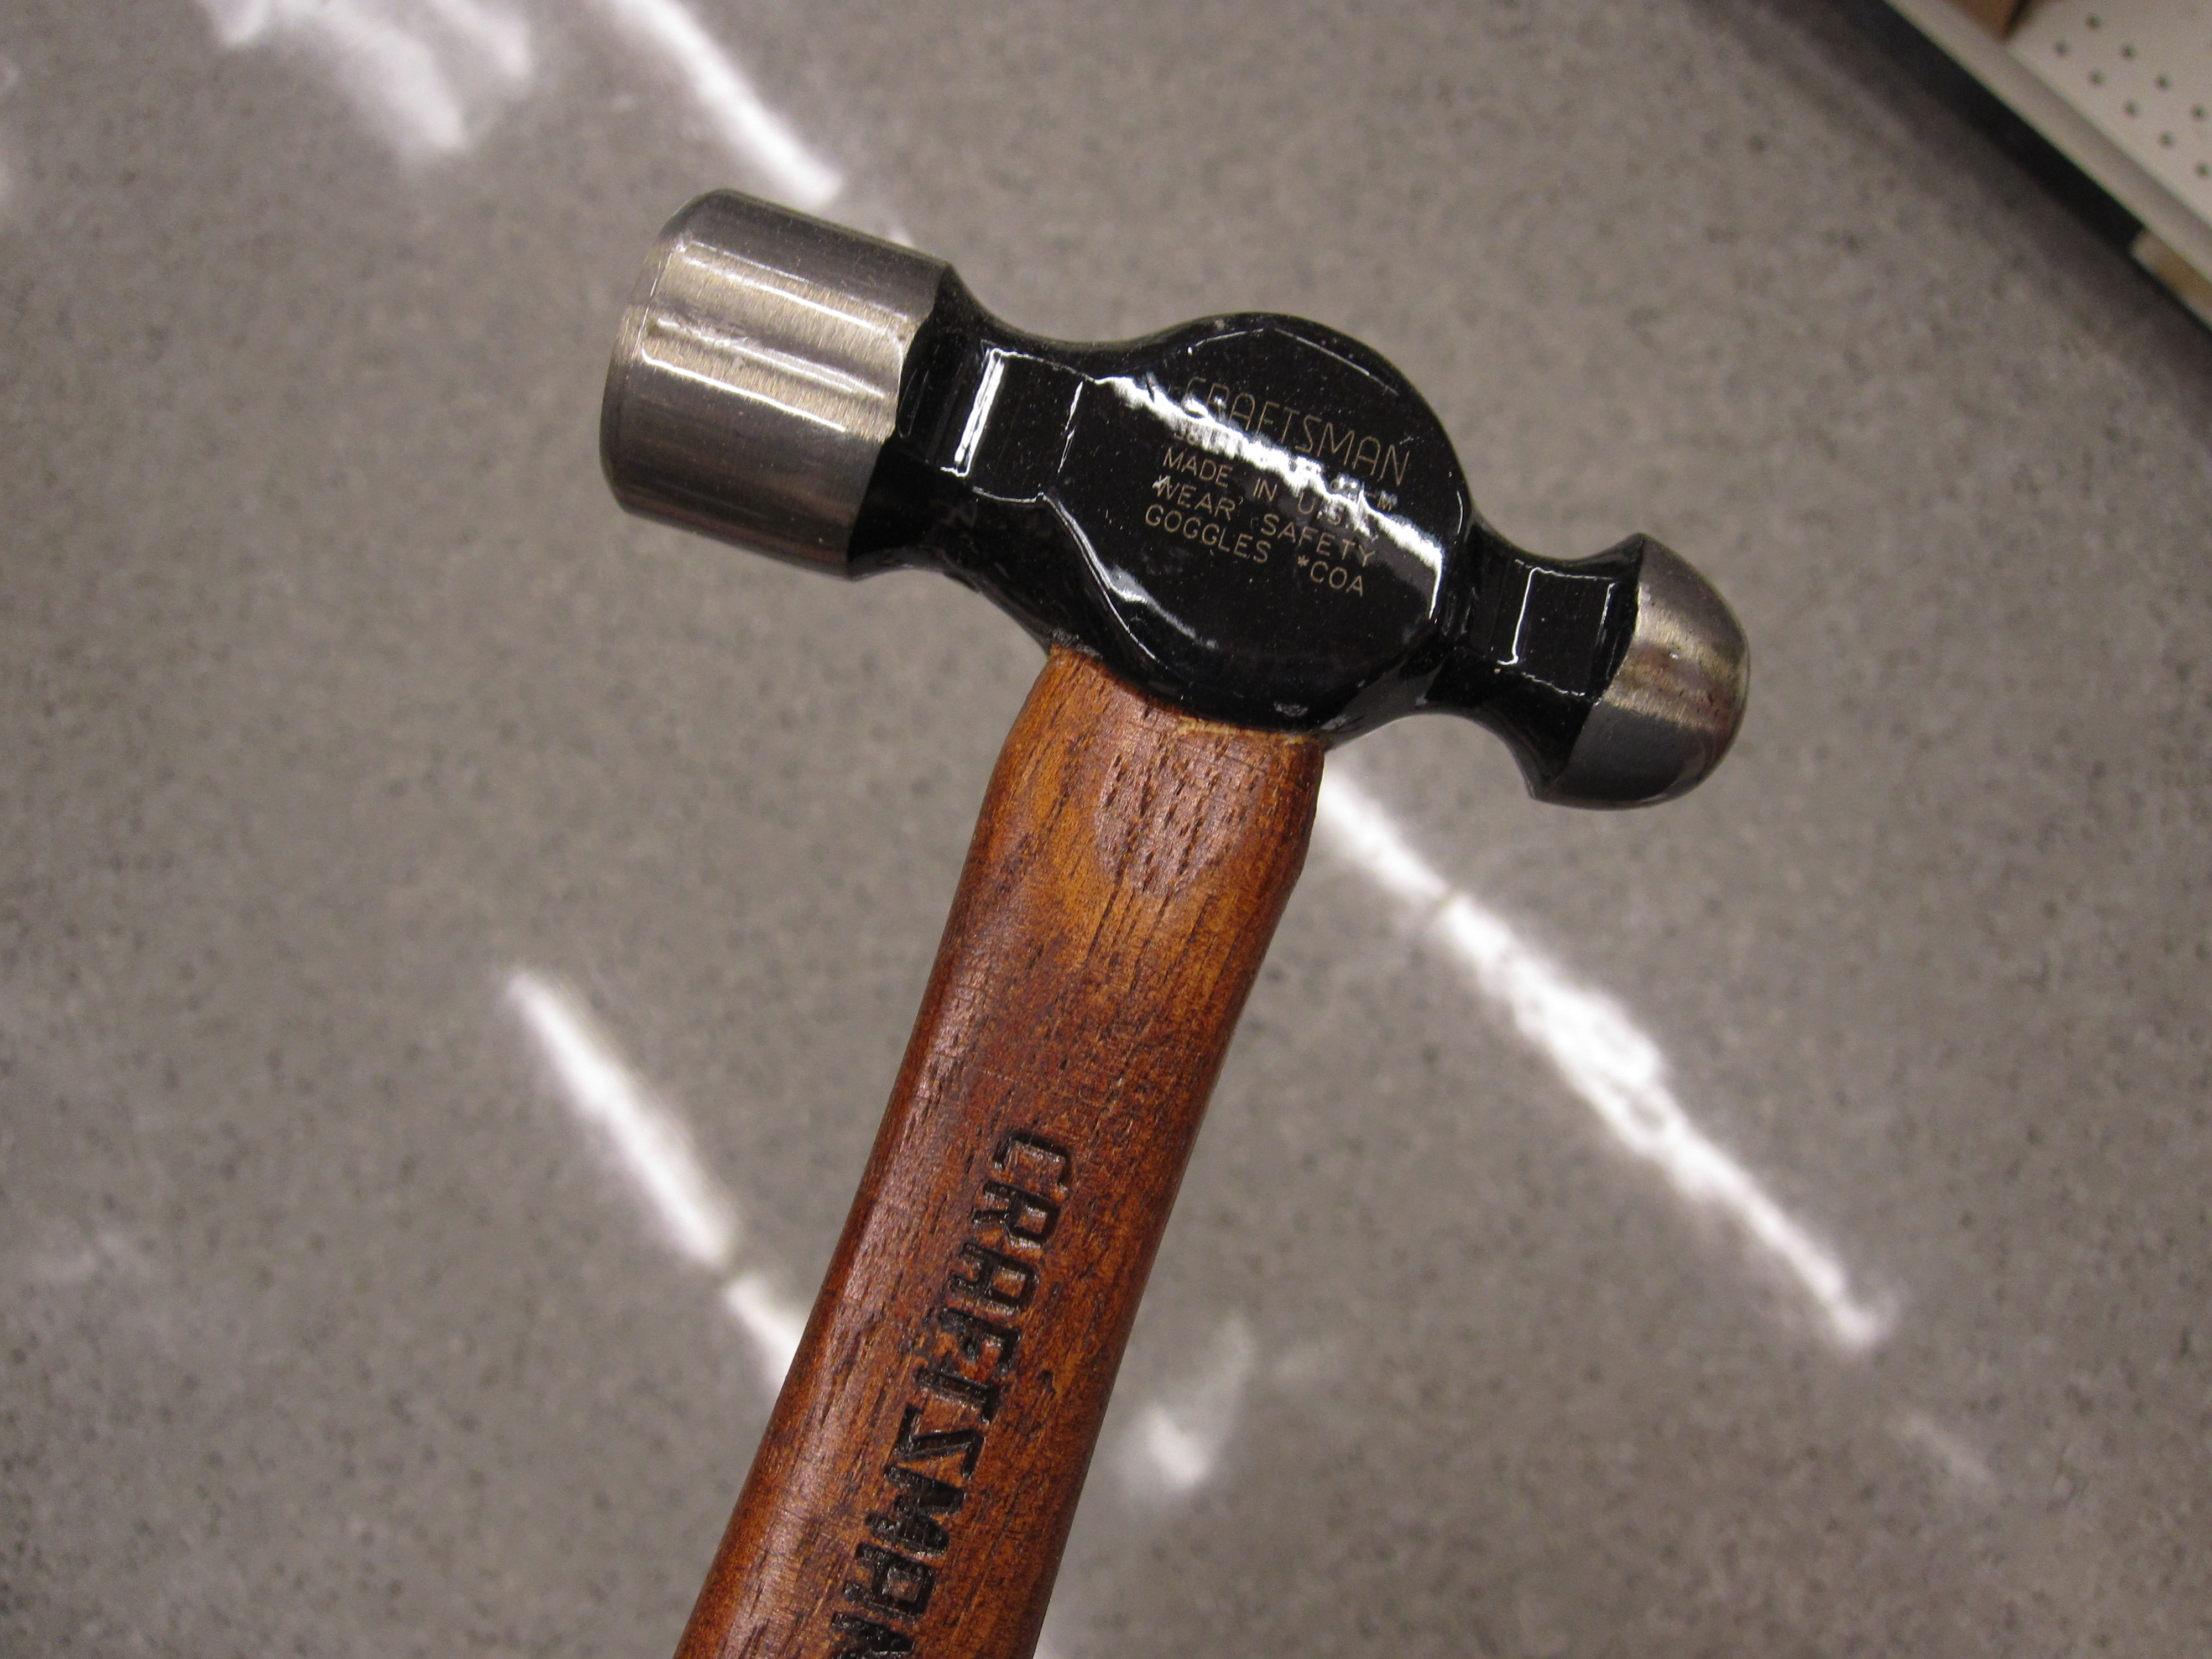
I have one of these hammers in my toolbox from my grandfather’s workshop. This is an older type of hammer, from a time when nails were manufactured differently and walls were constructed using different materials. Some people still prefer these hammers for specific tasks, but I always find a hammer claw far more useful to have on hand. (See that lovely “Craftsman” logo burned into the wood handle? You can read why it’s important right here.)
This next hammer doesn’t look like much of a hammer at all:

It’s a rubber mallet. It can been used for any project where you want some striking force, but worry about damaging the surface of whatever you’re striking. For example, an installer might use a rubber mallet to tap a new countertop into place right up against a wall, without risking a dent/crack in a wood/stone surface.
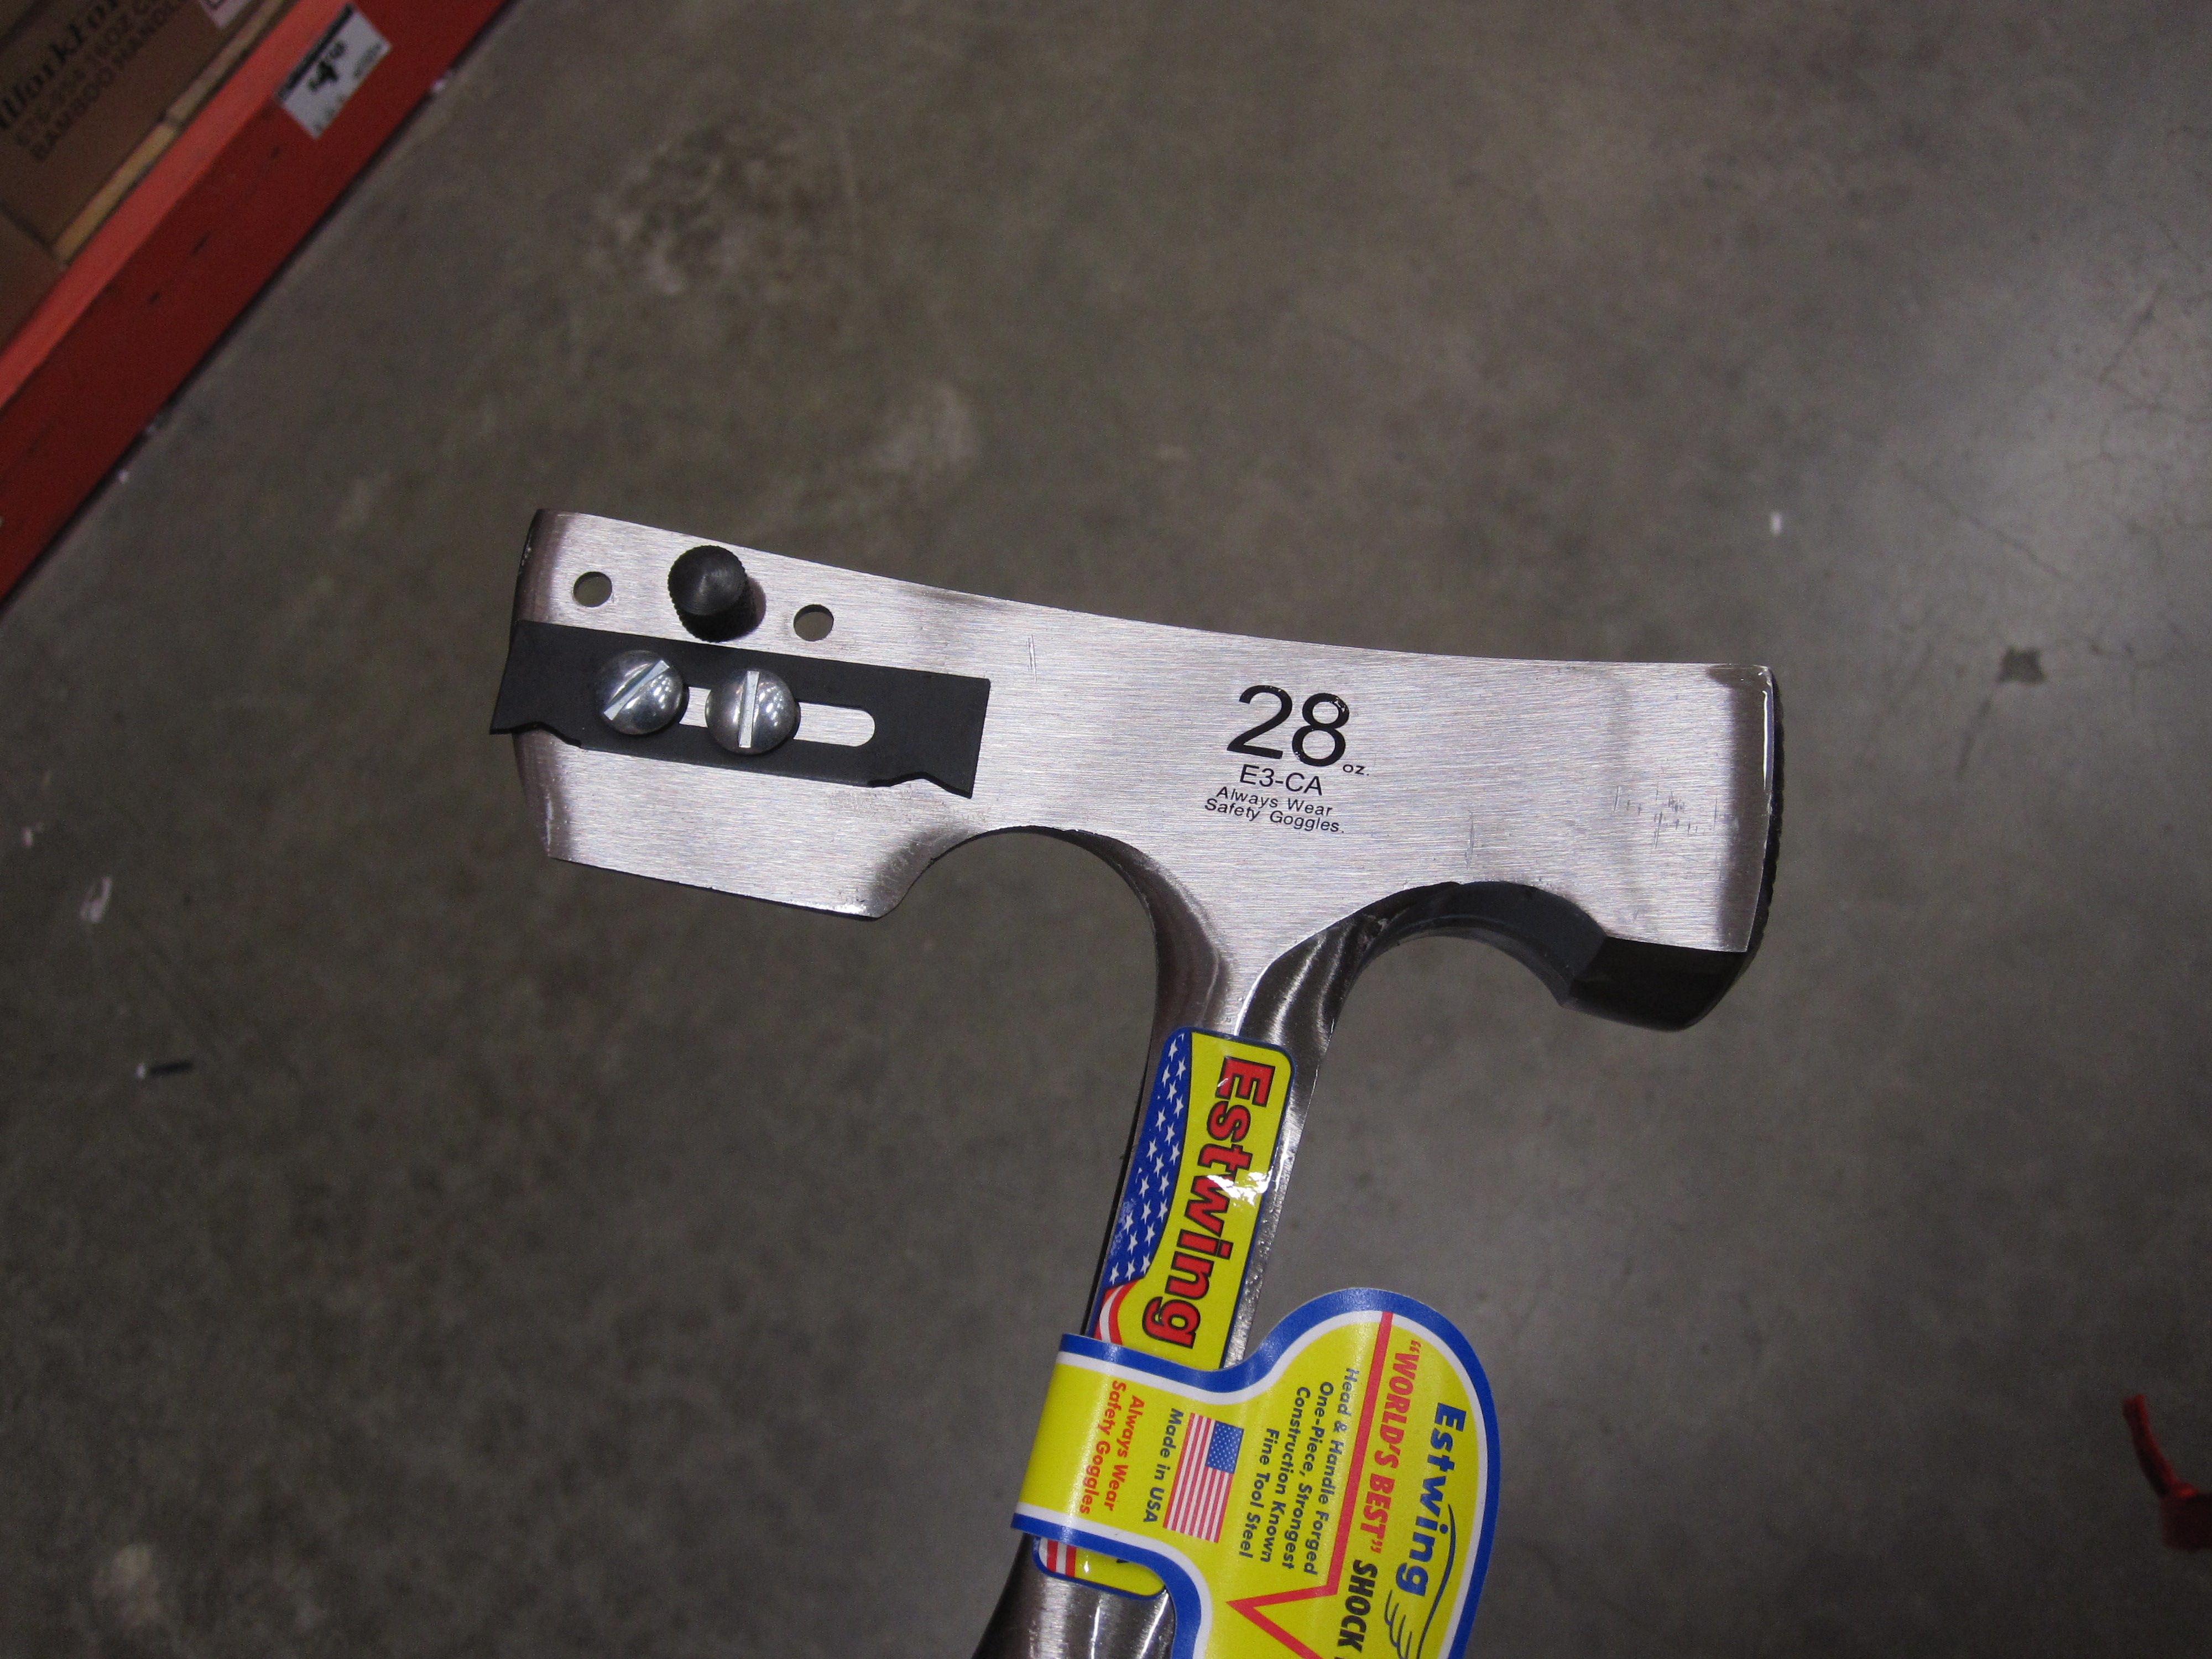
Here’s closer to what we’re looking for:

This hammer has a nice claw and a nice striking surface. Plus, the handle is made of bamboo, which is a renewable resource…
Stop right there.
Do not get sucked in by the marketing. I’m all for Greener Living, but a tool needs to do its job properly or we shouldn’t waste our money buying it. This tool does not meet the three criteria we discussed above. Swing the hammer around to see what I mean.
That short, light bamboo handle makes the handle MUCH lighter than the hammer head, which effects how the torque works. And you are now smart enough to know how important the torque is. (See how your tool knowledge is power?)
The handle also absorbs a lot of the shock of the striking action. A light wood, like bamboo, could split easily after just a little use. This is a great way to have a hammer head drop off onto your foot. If you choose a wood handled hammer, it should be made of a hard wood and it should balance nicely in your hand when you swing it.
Let’s move on…

This is what we are looking for! Good striking area, a balanced and weighty handle, a good claw and the grip feels secure in our hands. The only dilemma is which size to buy…

This hammer comes in a 12 inch size and a 16 inch size. Since we know that the handle of the hammer is what does the real work of the job, I would recommend the 16 inch hammer. That should cover you for just about any DIY, decor or home maintenance project. As in all things for our home, we should choose the smartest, most practical and budget-savvy tools. A good hammer can last you a lifetime.
Now you know:
- The essential elements of hammer
- How to use a hammer
- How to buy a hammer
So tell me, what are you going to use this knowledge for? Are you planning to hang some pictures? Do you have a little DIY project you’ve been wanting to try? Share your ideas and plans in a comment! There are more Toolbox posts in the works, but you can also leave me an idea for tools you want to learn more about…just leave a comment!
Toolbox: free giveaway!
*****The contest listed at the bottom of this post is now closed.*****
Last week we talked about the great quality of Craftsman tools and DIY homes. This week I want to talk about where to keep those hand tools that we have been learning about in the ongoing Toolbox series.
It may come as no surprise to you readers that I love to organize and putting your tools away is what help you be handy and prepared for the next project. Keeping your tools nicely organized also helps keep you and your loved ones safe in your home. Ever drop a hammer near your foot? Shifting and loosely piled tools can be dangerous.
Gone are the days of our grandfathers, when home toolboxes often looked like this:

Image courtesy of Home Depot
There are so many tool boxes available today, some of which can get rather large:

Image courtesy of Home Depot
and others that may require some extra diligence in putting things away:

Image courtesy of Home Depot
So, how do you know what to pick? I recommend a sturdy 17 inch to 18 inch toolbox, with at least one interior tray. This size of toolbox is long enough to hold your hammer, but not so bulky or heavy that it can’t be tucked away neatly in the bottom of your coat closet.
This is the perfect sized toolbox for the tools we are learning about and adding to your collection in the Toolbox post series, too. And to encourage you all to get your hand tools organized…I’m giving away a Craftsmen toolbox!

This toolbox is made from rugged plastic and has a sturdy metal clasp, just in case you ever drop it. (I’m told this sometimes happens…I, uh, heard it from a “friend”. Yeah.) It comes with an interior tray for organizing your smaller items and has plenty of room in the bottom for all the tools you should know how to use.

“But wait! There’s more!”
I’m also including two pairs of safety glasses in this giveaway. One pair is clear and the other pair is tinted for working outside comfortably. Every good DIY-er knows safety should always come first!

So, how can you win this handy gift set for your own home? I’m glad you asked…

To Enter: Leave a comment that begins with “I WANNA BE MORE HANDY!” and name the hand tool that intimidates you most and why. Does swinging a hammer at a clean wall make you nervous? Are pliers finicky? Do ratchet wrench sets have too many pieces? Let me know what frustrates you and we’ll tackle these tools in future Toolbox posts!
Enter By: Monday, August 8, 2011 at 10pm EST
Number of winners: Only 1, so enter now! Only one entry per email address will be allowed, so that everyone gets a fair chance of winning.
The Winner: Will be selected at random from the total number of comments by using random.org and will be announced in a post next Tuesday.
Want more giveaways? Let me know about the kinds of things you would like to win when you enter your comment. You might inspire a future giveaway!
Tools that may outlive you
On Monday, we talked about the Sears homes that sold so well during the first part of the 20th century. These homes were a big hit because they were very affordable and could be built almost anywhere.
You can read more about these homes in the post right here. I have to also give a special shout-out to the several readers who contacted me via email and are now checking to see if their homes are original Sears homes. Be sure to use this website as a guide in your searches! Very exciting!

Image courtesy of the Sears Archives
History
Today we’re talking about the tools that were used to build some of those Sears house kits. As you may remember, Sears included the design and almost all the building materials you needed, but you had to build the house yourself. Who better to buy your hand tools from than the company who designed your house?
These were great, quality hand tools, too. When you were done building your house, you could stand back and admire your work and use your tools for future home maintenance projects. It was enough to make a home owner feel like a real craftsman. So, starting in 1927, guess what Sears named their line of hand tools:
![]()
Catchy, huh?
Lifetime Warranty
Okay, all that history stuff is real interesting and all but what does this have to do with today?
I am recommending Craftsman hand tools as the official hand tools of our Toolbox post series. I’m not being paid or perked for this endorsement, I just believe in their products. And I’m not alone.
Popular Mechanics readers named Craftsman the favorite hand tools in their Reader’s Choice Awards. The US Army and Air Force Exchange Services sell Craftsman tools on US military bases all over the world. Craftsman hand tools are the official hand tools of the DIY Network and NASCAR (and those people need to be able to depend on their tools).
What makes these hand tools so special? It’s this:
If for any reason your Craftsman hand tool ever fails to provide complete satisfaction, return it to any Sears store or other Craftsman outlet in the United States for free repair or replacement.
What does this mean exactly?
First, this warranty is for hand tools. If you burn out the motor on your table saw, it’s on you. Hand tools mean hammers, screwdrivers, wrenches, ratchets (Sears invented the ratchet wrench. Did you know that?), hand saws, measuring tapes, pliers, wire cutters, mallets, utility knives, pry bars, levels, chisels…you get the idea. Craftsman also backs most of their non-powered lawn and garden tools under this warranty.

Secondly, this warranty is a unlimited lifetime warranty. Not your lifetime, the tool’s lifetime. For example, I could bring in my great grandfather’s hammer from 1927 (the year the Craftsman line was started) with no receipt or dated proof of purchase, and Sears would replace it for free. Did you see the title of this post? It wasn’t hyperbole. That, my friends, is CUSTOMER SERVICE.
Want More?
There are three other great things you should know about Craftsman tools. Ya know, just in case that amazing warranty wasn’t enough for you discerning DIY-ers.
- Craftsman has a great customer loyalty program called the “Craftsman Club”. The more you buy, the more points you earn that can be used to buy tools. You also get emails giving you advanced notice of new tools, sales and their monthly “Saver Days”, during which many of their tools are significantly discounted. Membership is free and your can learn more about if right here.
- Craftsman has a new line of tools called “Evolv”. They are less expensive than the regular tools, yet still backed by then awesome warranty. They also are packaged and designed with more environmentally considerate materials. You can read more about this line and browse its products right here.

- Craftsman can show you how to use your tools. They have monthly DIY projects online with free plan downloads. You can start by building a nice chess board and work your way up to a deck with a gazebo. Browse all of their projects right here.
My Extra 2¢
I want to close today with an explanation of why I think tools are important in our homes. Most home and design blogs don’t put much effort into discussing tools. It’s true, knowing how to DIY things around your home can save you a lot of money. I’m not expecting anyone to build their own homes anymore. (Good luck getting those inspected.) But I do have a point I want to make.
Building things with your own hands is almost a lost art in America. Most adults of my generation (Generation X) have no experience or memory of being taught how to use the most basic hand tools. Some men may have a few distant memories of a Pinewood Derby project, most women have nothing.
This is a missed opportunity for accomplishment. There is nothing like the feeling when you are creating or have repaired something yourself. A whole generation of American women went to work and built planes, ships, tanks, jeeps and more, with their own hands, to save our country. Today, most of their daughters and granddaughters are afraid to buy a hammer unless it’s pink. What have we become?

Image courtesy of The Saturday Evening Post
This is my rallying cry:
Let us take back our self-sufficiency. We are capable of more. Let us learn how to use tools well, maintain our homes, create new things and teach our children to do the same. Every man, woman and child can learn basic skills that will stay with them for a lifetime. There is no risk in learning and this economy is a great reminder that we all need to prepare ourselves better for life.
Who’s with me?
Leveling with you
I realized last week that it has been way too long since I have added to our Toolbox! Especially when you consider how very busy Summer is as a DIY season. So, let’s do some catching up today and add another great hand tool to our repertoire.

Today we are going to talk about the spirit level. That’s my level in the picture above and it gets quite a regular workout.
Levels are used to make sure that things are straight, or “level”, along a horizontal plane. Things that are straight/level on a vertical plane are called “plumb”. Easy, right?
It’s called a “spirit level” because there are little vials of liquid in it to help display the degrees of incline. The liquid is actually a “spirit” in the old sense of the word. It’s alcohol with a little dye in it. This will make more sense when I show you how to use one, in another paragraph or two.
How To Buy
Pictured below is the collection of levels available in the hand tools section of Sears, which is where I like to buy hand tools. (Love the Craftsman brand. I’ll have an upcoming post to explain why.)
 There are a lot of choices here, some pricey, some not. This large level stands six feet tall…

…but we don’t need anything that large for our toolbox. Or anything close to its $80 price tag. We’ll leave those big levels to the professional contractors and look for something smaller. This should do it:

This level is 9 inches long and its $6 price tag is much more practical. Once we get it home, we’ll just discard it’s plastic packing sleeve and throw it in our toolbox. The only tools that really should stay in their packing are power tools.
How To Use
Using a level is very easy once you know how. (Tip to parents: This is great job kids can help with during a DIY project in your home.)

There are three vials in each level. Each vial measures for a different type of plane.
The middle vial on any level always measures for a horizontal plane. Think of this as meaning that it will indicate if something is level with the horizon.
At one end of the level, on the left if we’re using the picture above, is a vial that measures for the vertical plane.

Just a tiny bit blurry on this pic, sorry!
See how the liquid and the lines on the vial run perpendicular to the horizontal vial shown above?
The other end of the level has a vial that measures a plane at a ninety degree angle.

Have you notices the little lines on each vial? They are very important. For something to be level on the plane you have chosen, the bubble has to be evenly between the two lines on the vial.
Here’s an example using the horizontal plane of my desk. I’ll put my level on the desk. However, if I hold one end of the level up, clearly creating an un-level surface reading, the bubble slides outside the lines:

But if I place the level flat on the desk, the bubble moves between the two lines.

This proves that my desk is level on the horizontal plane.
Remember that giant 6 foot level I showed you at the top of the post? Masons use it to make sure that their foundation surface is level before they start building. Carpenters use levels to make sure their frame for a door is hung properly. You may notice appliance delivery experts using a level to make sure your new stove or fridge is level on the floor, which can really make a difference in how that appliance works. The uses for a level are everywhere in a home.
How To Use: Example
We’ll use a picture frame from a previous project to show how to read a level in a real DIY situation. I put the frame pictured below on the wall as part of a large gallery wall, which you can read all about right here. (There are a lot of picture frames in this project!)
While the picture frame looks straight at first glance, I want to make sure that each frame is really level or else the whole grouping of pictures tends to look like a background scene from Inception. Just being honest here.

Can you see how the little bubble in the middle of the level is not between its vials lines?
All I need to do is make a slight tweak to the frame and voila!

The bubble is in the center of the level which means this frame is now straight. On to the next project!
Think you can do this? You’ll be amazed at all the places you can use a level in a home. How will you use one in yours?
Measure for Measure
I struggled with coming up with the right title for this post. Other working titles included:
- “The easiest tool you’ll ever use”
- “Don’t leave home without it”
- “How to look like a super hero in unexpected places”
These will all make sense in a moment.
If you look at the top of the page, on the menu bar you’ll see the link to the “Toolbox” page:

The “Toolbox” page carries all the links directly to our tool posts. The page now has two tool posts in it, including this post, but more will follow soon!
Every adult should have and know how to use a basic set of tools. Not only will it make your home look more beautiful (hammer+nails+art=lovely decor), but it will save you a lot of money over your lifetime.
Picking out tools can be intimidating if you don’t know where to start, but we are going to solve that problem. We’ll look at what each tool is for, how to use the tool and how to choose affordable, quality tools that will last a lifetime.
In short, we are gonna fill that “Toolbox” with useful and practical know-how. Build your own home’s tool box as you follow along. If you missed the how-to-swing-that-hammer post, check it out here.
(Hint, hint: Tools are a great gift idea, both for giving and receiving. Would some affordable tools fit into your future gift planning?)
Today, we are starting with “the easiest tool you’ll ever use”. And you already know what it is:

THE MEASURING TAPE
I know, this hardly seem like rocket science right now, but we are building our tool collection with practical must-haves.
You must have a decent measuring tape in your collection. That old yard stick in the corner of garage just doesn’t cut it. Time to upgrade!
HOW TO BUY
Here’s what to look for when buying your own measuring tape:
- 25 foot tape length, minimum. Some craftsman prefer a 50 foot tape length, but that can become a cumbersome weight and risk putting you in the pesky track-and-field measuring tape areas.

- One hand operation. You should be able hold the tape and operate the measurement lock with one hand. This means the lock should not be too stiff that you have to use your other thumb to help lock it.

- As sturdy plastic outer case, preferably with grips, around the tape. It only takes one time of dropping this baby while you are up a ladder to see why this matters.

No.

YES!!!!!
- A belt hook on the case. This can be a pain to use on your actual belt, but it can hook like a dream on any pocket of your jeans.

When you find a great measuring tape that meets all of these qualifications, buy it. Measuring tapes will break over time from natural wear on the tape, just like your old VHS tapes after about the 800th time you rewound them. However, a good measuring tape should not cost over $20 and will last for years.
Put your name on your tape in permanent marker and “don’t leave home without it” when you are shopping for DIY supplies. (Or else you’ll have to be that kinda dorky person that uses one of the measuring tapes they sell in the store and have to put it back on the right shelf before you check out…not that I know anything about that.)
HOW TO USE
I’m guessing you can already handle this one by yourself. If you’d like to feel more like a pro, you can practice catching the hook end of the tape:

and stretching out the tape while holding the hook in place. Baseboard molding corners are great for this practice.
You can also practice stretching out the tape to a long length and retracting the tape carefully and responsibly, rather than whipping and cracking it around like you’re a lion tamer.
BONUS POINTS
or “How to look like a super hero in unexpected places”
Buy a smaller, 12 foot measuring tape and keep it in your purse, ladies. (It will probably fit in either the zippered lining pocket or that weird extra pocket next to the cell phone pocket. You know the one I mean.) The tape will be lightweight due to its size, so it won’t be a bother to your daily travels.

You will be amazed at how often you use that tape when you are out and about. Decor, rough clothing measurements and will-that-fit-in-the-trunk problems are banished forever. And it only takes one time of producing that measuring tape for someone else, exactly when they need it, to make everyone stare at you like you’re a super hero. Just smile and say, “Yeah. I’m that organized.” (then zip your purse closed so they don’t see the rest of your clutter …been there).

Yep. That's my own purse. Keeping it real.
Not feeling self-sufficient in your own home can be very frustrating. Having decent tools in your home can make all the difference and really boost your self esteem. Even if you have never considered yourself handy, jump in and give it a try. Project by project, tool by tool, and in this case, “measure by measure” (yes, I did) your confidence will improve and you’ll be amazed at what you can do. It is a great feeling!
Do you need to replace the measuring tape in your house? Do you like the idea of a well-stocked toolbox for your home? What tools do you have questions about? Leave a comment !
Hammer time
Whether you are building or repairing something or just simply hanging one picture frame, everyone should know how to use a hammer in the proper, efficient way. This might seem like the MOST obvious thing in the world, but it is one of the most common things I find I need to teach my design clients. Based on that, I thought a little DIY know-how might be a handy post. Let’s get started…
Get out your hammer. Any old hammer, whatever kind you have, get it out of wherever you keep your jumble of tools. Mine live in a tool box at the bottom of a closet. Here’s the one we’re using for this post:

Pick up your hammer. How are you holding it? If you are holding it like this:

then this is the problem we are about to fix for you forever. Keep your hand on the middle of the hammer handle, for now, just where you have it. Draw the hammer back by bending your wrist upward, as if you are just about to hit a nail. Just like this:

Now swing the hammer forward to hit a (imaginary) nail in a wall. Do it few times. Watch your wrist. At the end of each movement your wrist is straight, almost tight feeling, in line with the rest of your arm, right? Okay. When you make the motion to hammer, this is the arch of motion from the hammer head:

When the hammer head reaches (roughly) the point in the arch shown by the second arrow:

the weight of the hammer head takes over the forward momentum from your wrist muscles. You should be able to feel the hammer handle kinda shift forward in your hand as the hammer head takes over the weight. Practice a few times to notice that weight shift. That weight you feel shifting is the real force that drives the nail into the wood/wall/etc. and it is called “torque” and is pronounced: TOR-k.
Torque is defined as, “the tendency of a force to rotate an object about an axis, fulcrum, or pivot .” (Thanks, Wikipedia!) In our application, the “pivot” is your wrist, and the weight shift you feel is the “force”. Fascinating, I know, but hang in there for my point: Torque is your friend. No, really. It will actually do the hammering for you. Let me show you. We are going to use hammer correctly now. Pick up your hammer again, but this time hold the handle properly, by its end. Like this:

Okay, we’re gonna swing the hammer again but with a few changes. First, move back a little from your computer. (No computers should be injured in the reading of my posts.) Next, you’re going to draw the hammer back again, but keep your wrist loose this time. Very loose! Let the weight of the hammer head drop it back toward your forearm. Like this:

Now, when we swing the hammer, use wrist muscles to start the swing, but don’t try to stop the swing with your wrist muscles. Just let torque work. Ready….swing!

Do it a few more times. See how much bigger the arch of motion from the hammer head is:

That larger arch brings more power to your swing. Your wrist went further, too. Didn’t it? Try it a few more times. See how your wrist is more relaxed at the end of these hammer swings? That is because the torque is doing the real work, the heavy weight lifting work. And the weight shift has happened much earlier in the arch of this swing. See:

Can you feel the difference? If the answer is yes, congratulations! You may still need a little aim experience, but you can now hammer like you mean it!
It will now only take you half the quantity of your previous hammer swings to hammer anything. Maybe even less. And your wrist won’t get tired. And you can say to others, “What are you doing with your hammer?! Let me show you…” And you can pretend you’re one of these guys:

Image courtesy of This Old House
Next time you’re watching good home improvement show or find yourself near a construction site, watch how the real pros do it. An experienced contractor will start their hammer swing with their elbow bent and the hammer head almost back at their shoulder. That is some torque at work!
Was this an eye-opener for you? How will you use your new technique? Would you like more DIY tips like these? What do you need help with?