Monthly Archives: July 2011
Laughing matter
It’s Friday and I think it’s time for a laugh.
If you follow this blog, you are probably a fan of home design, great living and loving your own home. You might also love the real estate listings that I share with the Facebook and Twitter fans/followers. Perhaps you are also reading along because you like my household tips, recipes and budget-conscience solutions. In any case, I hope you are reading for fun.
I started this blog as an extension of my interior design business and to share my passion about my work. But, at the end of the day, all of the blog subject matter is really about enjoying your lifestyle more. As my mother would say (and I love this expression), “It’s not like we’re running the Pentagon here.”

Image courtesy of Wikipedia
With that in mind, I thought we could all share a belly laugh at ourselves. I’d like to introduce you to 3 websites that I read regularly. I have “liked” them all on my personal Facebook page, because they deliver fun daily. You might enjoy them, too, and a laugh shared between friends is the best kind of laugh.
Catalog Living
This blog is written by comedienne Molly Erdman is supposedly “a glimpse into the exciting world of the people who live inside your catalog”. The main characters in this story, always just out of the picture frame in your catalogs, are Gary and Elaine.
Gary and Elaine are a married couple who have ongoing squabbles about their preferred lifestyle and decor choices. We see all the catalog images with a conversation-like description of what the hot button issues are really about. Sometimes you really have to study the pictures to understand the references, but it just makes the staged catalog photos that much more silly.
Fair warning: If you read this blog long enough, you will find yourself composing these captions when your own catalogs arrive in the mail. Pottery Barn even included a reference to a “Gary and Elaine” on a chalkboard in a recent catalog, which many fans sent in to the website.
Here are a few recent examples of Catalog Living:


Magazine Living
Also written by the talented Ms. Erdman, this blog focuses on the images you can find in shelter magazines, such as Country Living, House Beautiful, etc. This site’s main characters are Martin and Gareth, who have lovely taste, even if they don’t agree with each other about it.
Here are a few great examples:


Unhappy Hipsters
Doesn’t the name say it all? I love this blog for the modern furniture layouts and sarcastic use of proper design terms. The first image in these examples is one of my all-time favorites.


Have you found a good giggle or two here today? You should check out the archives of these blogs for more laughs. I love jokes that force us to not take ourselves too seriously. If we can’t laugh at ourselves, we’re missing a lot out of life!
Have a great weekend and I’ll see you on Monday!
Tools that may outlive you
On Monday, we talked about the Sears homes that sold so well during the first part of the 20th century. These homes were a big hit because they were very affordable and could be built almost anywhere.
You can read more about these homes in the post right here. I have to also give a special shout-out to the several readers who contacted me via email and are now checking to see if their homes are original Sears homes. Be sure to use this website as a guide in your searches! Very exciting!

Image courtesy of the Sears Archives
History
Today we’re talking about the tools that were used to build some of those Sears house kits. As you may remember, Sears included the design and almost all the building materials you needed, but you had to build the house yourself. Who better to buy your hand tools from than the company who designed your house?
These were great, quality hand tools, too. When you were done building your house, you could stand back and admire your work and use your tools for future home maintenance projects. It was enough to make a home owner feel like a real craftsman. So, starting in 1927, guess what Sears named their line of hand tools:
![]()
Catchy, huh?
Lifetime Warranty
Okay, all that history stuff is real interesting and all but what does this have to do with today?
I am recommending Craftsman hand tools as the official hand tools of our Toolbox post series. I’m not being paid or perked for this endorsement, I just believe in their products. And I’m not alone.
Popular Mechanics readers named Craftsman the favorite hand tools in their Reader’s Choice Awards. The US Army and Air Force Exchange Services sell Craftsman tools on US military bases all over the world. Craftsman hand tools are the official hand tools of the DIY Network and NASCAR (and those people need to be able to depend on their tools).
What makes these hand tools so special? It’s this:
If for any reason your Craftsman hand tool ever fails to provide complete satisfaction, return it to any Sears store or other Craftsman outlet in the United States for free repair or replacement.
What does this mean exactly?
First, this warranty is for hand tools. If you burn out the motor on your table saw, it’s on you. Hand tools mean hammers, screwdrivers, wrenches, ratchets (Sears invented the ratchet wrench. Did you know that?), hand saws, measuring tapes, pliers, wire cutters, mallets, utility knives, pry bars, levels, chisels…you get the idea. Craftsman also backs most of their non-powered lawn and garden tools under this warranty.

Secondly, this warranty is a unlimited lifetime warranty. Not your lifetime, the tool’s lifetime. For example, I could bring in my great grandfather’s hammer from 1927 (the year the Craftsman line was started) with no receipt or dated proof of purchase, and Sears would replace it for free. Did you see the title of this post? It wasn’t hyperbole. That, my friends, is CUSTOMER SERVICE.
Want More?
There are three other great things you should know about Craftsman tools. Ya know, just in case that amazing warranty wasn’t enough for you discerning DIY-ers.
- Craftsman has a great customer loyalty program called the “Craftsman Club”. The more you buy, the more points you earn that can be used to buy tools. You also get emails giving you advanced notice of new tools, sales and their monthly “Saver Days”, during which many of their tools are significantly discounted. Membership is free and your can learn more about if right here.
- Craftsman has a new line of tools called “Evolv”. They are less expensive than the regular tools, yet still backed by then awesome warranty. They also are packaged and designed with more environmentally considerate materials. You can read more about this line and browse its products right here.

- Craftsman can show you how to use your tools. They have monthly DIY projects online with free plan downloads. You can start by building a nice chess board and work your way up to a deck with a gazebo. Browse all of their projects right here.
My Extra 2¢
I want to close today with an explanation of why I think tools are important in our homes. Most home and design blogs don’t put much effort into discussing tools. It’s true, knowing how to DIY things around your home can save you a lot of money. I’m not expecting anyone to build their own homes anymore. (Good luck getting those inspected.) But I do have a point I want to make.
Building things with your own hands is almost a lost art in America. Most adults of my generation (Generation X) have no experience or memory of being taught how to use the most basic hand tools. Some men may have a few distant memories of a Pinewood Derby project, most women have nothing.
This is a missed opportunity for accomplishment. There is nothing like the feeling when you are creating or have repaired something yourself. A whole generation of American women went to work and built planes, ships, tanks, jeeps and more, with their own hands, to save our country. Today, most of their daughters and granddaughters are afraid to buy a hammer unless it’s pink. What have we become?

Image courtesy of The Saturday Evening Post
This is my rallying cry:
Let us take back our self-sufficiency. We are capable of more. Let us learn how to use tools well, maintain our homes, create new things and teach our children to do the same. Every man, woman and child can learn basic skills that will stay with them for a lifetime. There is no risk in learning and this economy is a great reminder that we all need to prepare ourselves better for life.
Who’s with me?
Like shooting cash in a barrel
Been hot enough for ya?
Isn’t it a sad sign of our times that I can write that sentence and know that I am speaking to everyone in America? I can also safely say that if you maintain a garden or lawn, the only number higher than our recent temperatures may be on your water bill.
All the more reason for today’s Greener Living post, because we’re talking about rain barrels.

Image courtesy of Better Homes and Gardens
Definition
A rain barrel is defined as any water tight container that can catch rain. Most people just put a large rain barrel at the end of their gutter downspout and let gravity do the work. A fitted lid on a rain barrel is very helpful in keeping mosquitoes from laying eggs in your clean water. You may also like a spigot for your hose or watering can.
Water collected from rain often has lower quantities of chemicals than that of municipal water sources. Rain water can be especially helpful if you have plants that have sensitive pH levels. Rain barrels in the 50-80 gallon sizes are the most popular for gardens.
Savings
Drinking water is a commodity we Americans take for granted. Lowering the energy costs needed by our communities to collect, treat and distribute clean water helps everyone’s budget. A little conservation by us at home can go a long way to conserve our resources at large.
According to the Environmental Protection Agency, every 1 inch of rain falling on 500 square feet of roof can add up to 300 gallons of water. The EPA also estimates that most gardeners in the US could save 1,300 gallons of water just during the hot summer months.

Image courtesy of the National Weather Service
How much water does your area average per year? Click here to choose your state and city, and then scroll down to view your average annual rain fall in inches. Compare these inches to your water bill. You may be surprised at the money flooding out of your gutters every year.
Popular Models
There are many more affordable rain barrels available today than there were ten years ago. Pictured and linked below are a few of the popular options out there. While you may experience some sticker shock at the initial prices, just remember how much you are already spending to water your lawn. You only have to buy a rain barrel once.
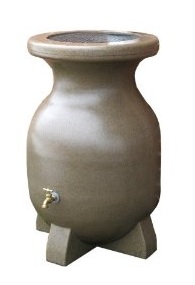
This rain barrel has a classic urn-like profile:
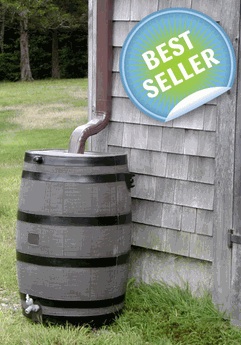
 This rain barrel takes the “barrel” description quite literally:
Short on space? Consider this flat backed rain barrel. It still holds 80 gallons of water.

This water barrel includes a solar-powered pump to help give you more water pressure for your garden hose:
 While we’re thinking about greener barrel options…how about this one?

It is made from recycled plastic, holds 53 gallons of water and is now on sale for $79 and only $10 for shipping. Green and budget friendly, my kind of deal!
Want to try making your own rain barrel? Check out this great DIY tutorial from Better Homes and Gardens.
“Make It Work”
As the fabulous Tim Gunn might argue, one major issue for many people about rain barrels is the aesthetic. I hear you. You’ve made a beautiful garden and/or spent a lot of money and time landscaping your property to be elegant and tasteful. A big, bright plastic barrel against your house was not part of your plan.
Never fear. Paint technology has finally caught up with us and will now allow us to paint plastic. I recommend using Krylon’s “Fusion for Plastic” paints. Krylon is a nationally recognized brand of great spray paint and can be found easily at retailers in most areas.
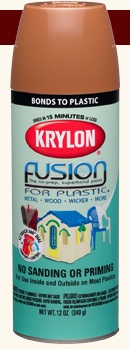
This revolutionary paint comes in many colors that will match or blend well with your house exterior or outdoor areas. Just follow the instructions on the can and be sure to let the paint dry thoroughly before it gets splashed with water. (Just a reminder, I’m never paid or perked for recommending products. I share only because a good product can be hard to find. If this helps you in your home, I’m glad!)
So, there you have it! Another green solution that will save you money, install easily and is available for under $100. You could be saving money before your next water bill arrives!
Any of you readers have any other tips for rain barrels? If you have a water bill, are you enjoying savings and a beautiful green lawn this summer? Please share your experiences in a comment and help inspire others as part of our Greener Living Challenge!
Savoring Home: Slow cooker BBQ
I generally prefer to spread out my recipe posts, since this is primarily a home and design blog. I know I just gave you some great summer fruit cocktail recipes last week. This recipe was already planned for the Fall, since we love a nice smokey bbq meal on a cool autumn evening. Mmmmm, comfort food!
However, when this past week’s temperatures reached oh-my-goodness-my-eyeballs-might-melt, Mr. CARO and I looked to our slow cooker to keep us from having to turn on the oven. This is one of our all-time favorite slow cooker recipes. Just in case you have had a similar weather experience lately (and I don’t know anyone in the US that hasn’t), I thought I’d share this easy recipe now.
Ingredients

- Salt
- Pepper
- Garlic powder
- 18 oz. / 590 mL bottle of your favorite BBQ Sauce (We like this brand.)
- 3 pounds / 1.4 kg of beef, either a roast or stew beef pieces (This is a great way to use a roast in the summer. I’m using the stew beef pieces for the pictures and explanation today, but I’ll give you instructions for both cuts of meat.)

Preparation
For a roast: Salt, pepper and garlic powder the outside on all sides of the piece of meat.
For stew beef pieces: Salt, pepper and garlic powder one side only of each pound / 454 grams of beef.

Place the roast or beef pieces in the slow cooker.

Pour in the bottle of bbq sauce and make sure all sides of the roast get coated in the sauce, or thoroughly stir the beef pieces in the sauce.


Put the lid on the slow cooker, put the heat setting on “Low” and start your timer:
- A 3 lb. roast should cook for 8 hours
- 3 lbs. of stew beef should cook for 6 hours

Now, walk away. See a movie, take a nap, read a book. Go enjoy your day!
After your 6 or 8 hour timer has gone off, use a slotted spoon to remove the beef to a cutting board. Leave the bbq sauce in the slow cooker, still on “Low”. Using either a fork and fork or a fork and knife combination, shred the beef into smaller pieces.

When you are done shredding, your beef should look like this:

Now return the beef to the sauce in the slow cooker and allow the beef to warm through, which should take about 30 minutes.
After 30 minutes, dinner is served!

We like to serve pulled beef sandwiches with a buttery mix of summer beans or green beans. We just love the flavor combination.

We also like that this recipe often makes one of our other favorite things: easy leftovers!
 We just fill up plastic containers for the freezer and when we are tired (or another heat wave knocks us off our feet), we have dinner reinforcements at the ready!
That’s it! Five ingredients and dinner cooks itself while you’re off doing something fun…or at least something cooler.
Do you have a favorite go-to meal when summer temperatures drive you from the kitchen? What is your favorite bbq sauce? Leave a comment and share your solutions!
The ultimate DIY house
This post started out with one, simple thing as its subject, but it has now evolved into three posts, after I organized all my thoughts. It will all make sense by the end of next week with a new giveaway. I promise!
Today, we’re looking at one of the most popular home manufacturers of the 20th century: Sears. (Before your mind goes there, I’m not giving away a house next week.)

You know I love a good house plan (you can read more about that here and here), so I had to share this great treasure trove of history and design. Isn’t it interesting to see how previous Americans chose to live? Wait until you see how they got these homes…
History
Sears & Roebuck Co. began selling building supplies in the 1895 edition of their famous mail-order catalog. It was a failure. Sears was considering closing down the building supplies division in 1906 when a new manager, Frank W. Kushel, decided to offer the supplies shipped directly from the factory. This eliminated all of the storage costs for Sears.
(Side note: Frank Kushel came to the building supplies division from managing the china department of Sears, proving the old adage that a good salesman can sell anything.)
In 1908, Sears issued its first kit home catalog, know as the “Book of Modern Homes and Building Plans”. The houses ranged in cost from $163 to $3,506.

This book contained 22 house plans, which the customer could choose from and order directly from Sears. These were very flexible designs that often can with several floor plan options that could be modified to suit the owner’s tastes and needs.
Most of the building materials were included in the price of the home: lumber, windows, hardware, etc. Masonry, due to weight, had to be bought near the house’s building location. Plumbing and electrical kits were sold separately, in part because some homes were often built beyond the local municipal reaches of electricity, sewage, etc. Each house also came with a detailed construction manual, which can in very handy because…you had to build the house yourself.
Image courtesy of cabincreekcds.com
What made these houses so affordable, and therefore popular, is that they eliminated the labor costs of professional builders. Your house would arrive 30,000 pieces on two railroad boxcars. You built the house yourself, on your lot, on your schedule, using the included tools and directions from the construction manual. The manual even came with a prominent fore-warning: “Do not take anyone’s advice as to how this building should be assembled.” Talk about “sweat equity”, right?
Sears also sold out buildings, such as garages, barns, out houses, etc. Due to the municipal plumbing issues I mentioned above, out houses were sold well in the ’30’s. Over the years, Sears also featured building innovations in their house plans as they came on the market, such as drywall, plumbing upgrades and asphalt roofing shingles.
While Sears didn’t invent the mail-order house, they were the largest American retailer of the concept. In the years that Sears sold home kits, between 1908 and 1940, an estimated 100,000 houses were ordered by mail. Standard Oil even built a company town in Illinois using over 190 Sears houses. Many of these homes still survive all over America today.

House Examples
Sears offered 3 grades of houses. These grades accommodated budgets and regional house uses ever further than floor plan adaptations. However, this does not mean the lower grade houses were less sturdy, just that they used different materials.
The first grade of house was known as “Simplex” or “Econo-Bilt”. These buildings were often smaller, with less daily use, like vacation cottages and hunting cabins. Here’s an example of one as it appeared in the catalog:
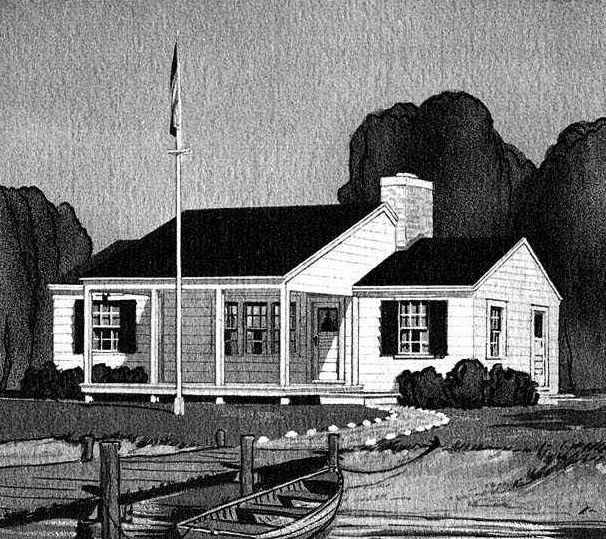

Notice anything missing from that house plan? You would eventually. Remember, out houses are sold separately…
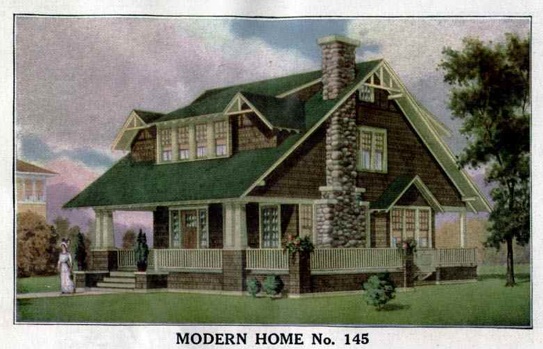
The next grade of house was the “Standard Bilt” grade. This grade of house was designed primarily for warmer climates. It included floor plans with more consideration for warm breezes, such as this example:

 See how the Hall and the Kitchen can be opened on two sides to allow breezes to cool the rooms? Also, the bathroom is off of the porch only, which is not ideal for a Midwestern Winter. Love the porch on this house, though.
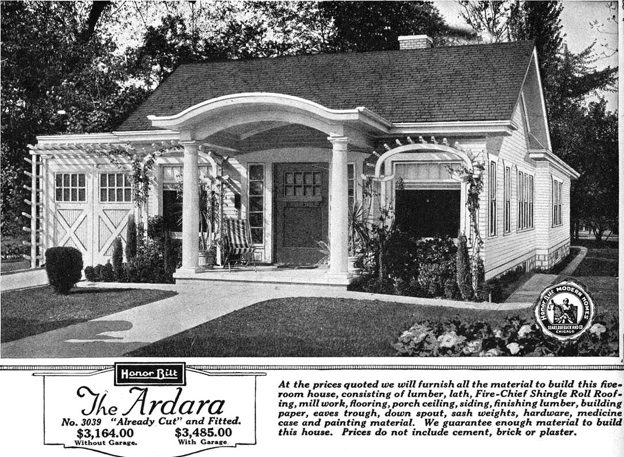
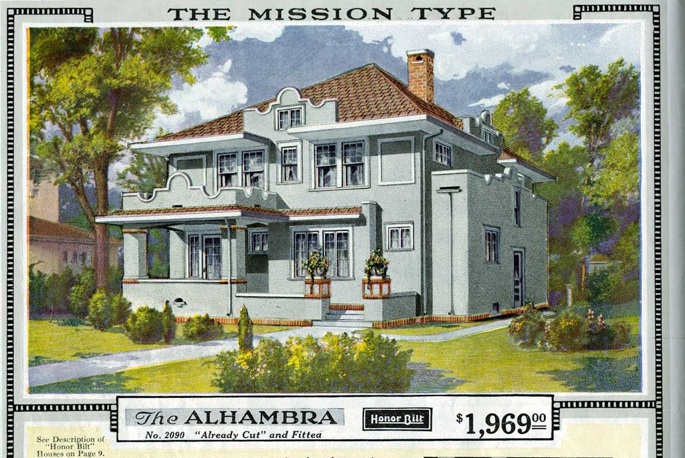
The last and most expensive house grade was the “Honor Bilt” house. Enticing name, huh? Clever marketers at work. These houses used the highest grade lumber and ALL of its pieces arrived for construction pre-cut and pre-fitted. They tended to have much more variety in architectural style. Some of these homes had some quite large floor plan options for the day, too. Here’s an example:


These “Honor Bilt” houses were very popular. They are often identified today by their wood shingle siding, which was a very popular option in an already well established architectural style of the day.
I also wanted to give you a small sampling of the many architectural styles Sears offered in their houses. (I’ve linked the location of all the houses and their plans in paragraph that follows these images.)


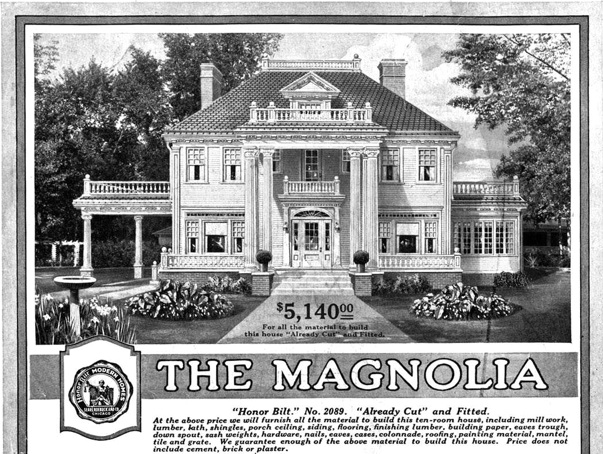
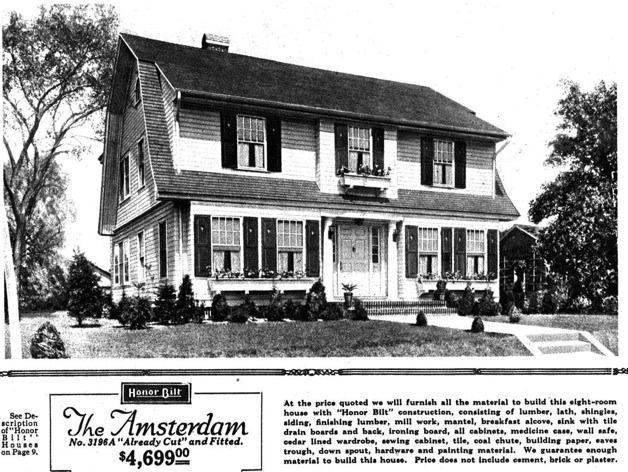
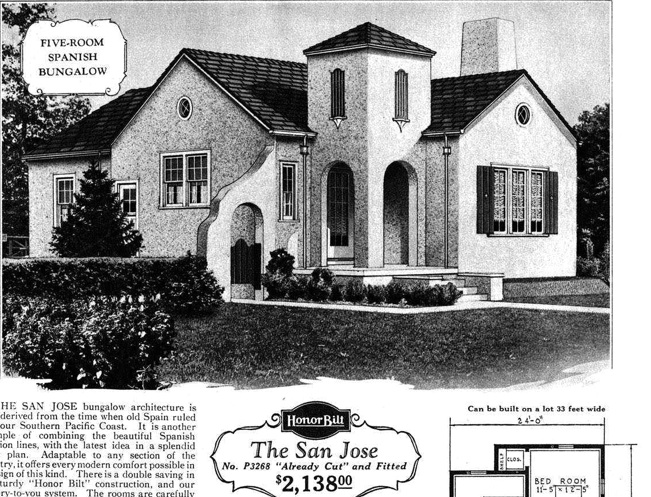

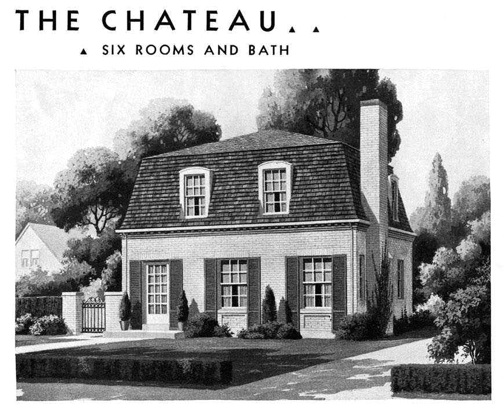
See a house you love? Except where otherwise noted, all of the pictures in today’s post are courtesy of the Sears archive website about Sears houses. They have dozens of other house pictures with plans to drool over in their image section. You can explore them all right here.
I also recommend you browse this website for great personal stories and pictures of Sears homes and the families who built them. There are also a lot of nice pictures of Sears homes as they stand today. It’s fun to see original sales receipts, crates that the building supplies arrived in and family pictures of the houses being loved over generations.
Do any of you live in or near a Sears house? Do you like floor plans from older house designs or do you prefer a more modern layout? What is the largest thing you have ever bought from a catalog? Leave a comment and share your experiences!
Museum Hopping: Greenfield Village
Today’s museum field trip takes us to beautiful Dearborn, Michigan. We’re visiting Henry Ford’s Greenfield Village to explore American history, as told through our lifestyles and innovations. There is so much to show you that I think we should start with a map so you can understand the scale of this place:

As you can see, the outdoor museum is spread across many acres, (90 acres, to be exact, with another 150 acres of fields and pastures surrounding the museum. You can spend all day exploring the exhibits and still have more to see. Before we start wandering around, let me give you a little back history of how this place came to be.
History Collector
In the 1920’s, automobile entrepreneur Henry Ford decided that he wanted to preserve “Americana” for future generations. He toyed with preserving a few dubiously historic buildings in Massachusetts before he really hit his stride. Ford started collecting buildings related to American industry and innovation and moving them, piece by piece to Michigan.

Henry Ford, circa 1919 Image courtesy of Wikipedia
Once each building or house arrived in Michigan, he had it reassembled in an area designed as its own village. (A “village” that sits in the middle of a huge swath of “green” “fields”. See how he did that?) All of these buildings came together to form a large village of structures spanning the 3 centuries of American life.
Greenfield Village was officially founded in 1929 as an educational and historic landmark. When viewed as a whole, it can be quite misleading as a representation of American history. It is too clean, too socially stable, which real American life has never been.

Image courtesy of Wikipedia
However, there is little doubt that most of these buildings would have fallen to ruin if left in their original locations. Without the collector’s instinct of a man with Henry Ford’s time and money, modern Americans would have little opportunity to stand in and look at the daily life and work of many great innovators.
What To See
Greenfield Village has over fifty historic buildings to see and tour. All of these buildings are populated by either costumed actors or modern-day artisans creating real products using old techniques. (You can even buy their beautiful wares at the gift shop later.)
The village is further sub-divided into several “neighborhoods”. Some of the buildings focus on industry and some are homes which allow you to step into everyday life of a certain period. Just to add one more layer to your visit, you can also choose to travel in several modes of transportation around the park.

There are so many buildings and homes to see that it is hard for me to make a definitive list of must-sees for you. As usual, it is frowned upon to take interior pictures of houses and museum buildings. Nevertheless, here are few of my favorites that you should see for yourself:
- The Firestone family farm (yes, the tire brand Firestones)
- The 18th century farm (lots of live animals to see at work)
- The General Store
- The Milliner’s shop (where you can try on hats)
- Poet Robert Frost’s house
- The Heinz farmhouse (you can smell all 57 spices about a block away)
- The Eagle Tavern ( you can eat a meal here, too)

- Dictionary author Noah Webster’s house
- Henry Ford’s family farm
- The Windmill
- Logan County Courthouse (where Lincoln practiced law)
- The Boarding House
- The Glass Shop (with real blown glass craftsmen at work)
- The Cider Mill
- The Wright Brothers Cycle Shop (birthplace of the airplane)
- Thomas Edison’s Menlo Park Laboratory (birthplace of the light bulb)

Great Events
Greenfield also hosts fun events throughout their calendar year that are a fun chance to bask in the community of bygone eras. While I haven’t been to all of these myself, I cannot overlook how fun they sound.
- Car Shows: It will probably not surprise you to know that Greenfield Village hosts great historic car shows. (It would be odd if they didn’t.) There are several shows on the annual calendar, which allow you to choose between your favorite era of cars.

- Historic Baseball Games: These are played using the 1867 rules with seating on a grassy hillside overlooking the field. As they advertise it: “No cussing. No spitting. No millionaire players. Just baseball.” You can learn more about the teams right here and about their playing season right here. If you visit in August, you might be lucky enough to catch the World Championship Games. Batter, up!

- Ragtime Street Fair Weekend: This annual music festival features live music on multiple stages by jazz musicians from all over the country. Fresh summer food is served and dancing is encouraged as the park stays open late to enjoy the syncopated melodies.

That concludes our tour of Greenfield Village for today. Before we leave though, I thought you might like to browse around the extensive museum gift shop, which you can visit right here. Also, consider exploring their lovely historic art shop, which you can link to directly right here. You might find a lovely image to art to the art in your home!
Unless otherwise noted, pictures in this post come from the Greenfield Village Museum. You can learn more details about the museum and plan your own visit by exploring their beautiful website right here.
What would you explore first at Greenfield Village? Have any of you visited Greenfield Village? Do have any tips you would like to add? Leave a comment!
Savoring Home: 5 fruity summer cocktails
Two weeks ago, I wrote a post about my favorite summer fruit dessert recipes. (You can read the original post right here.) Wow, it was a popular post, with a record number of hits! I had no idea that you all were such fruit fans. Or maybe you’re all just huge dessert fans. Either way, I’m glad to know I’m not alone.

Image courtesy of allposters.com
To follow up that post, I thought I’d pull together some of my favorite fruity cocktails. You’ll notice that I’ve posted this on a Thursday. I wanted to give you all time to go to the store before your TGIF cocktail hour. Plenty of time to visit the produce section of the grocery store and that other store that sometimes, on really good days, requires you to show an id.
Here, in no particular order, are linked recipes for some truly fabulous adult beverages to celebrate the end of your summer work week:

Sangria
Mr. CARO is huge Hispanophile (Yes, that’s a real word. I checked.), so sangria is always a hit in our home. I have made this recipe for parties and had our native Spanish friends ask me for the recipe because it was better than their own. What could be better than that kind of endorsement? Nada.

June Bug
I would have never thought of putting orange sherbet in a cocktail, but it is oh so nice. This is a great recipe that can be non-alcoholic or, as they say, “fully loaded”. Just make sure you don’t mix up the glasses!

Frozen Gin Lemonade
Did you see yesterday’s post about other uses for lemons? (You can read about it right here.) Now you can add one more idea to your list of ways to use up extra lemons. In case it matters, this recipe is vegan. Yeah. Just try not to give yourself “brain freeze”.

Watermelon-Lime Cooler
What are going to do with the other half of that watermelon? I’m sure you’ll think of something… This is another one of those can-be-non-alcoholic cocktail recipes, but who are we kidding? It’s hot and getting the vodka out is another excuse to open the freezer door.

Peach Bourbon Sour
A close examination of this recipe reveals that it can be made with peach, blackberry, apricot or ginger preserves. You can have a nice cocktail and be cleaning out those jams in the fridge. That is some impressive multitasking!
Have a great beverage recipe that you’d like to share? Feel free to put a link in the comments section. The more, the merrier! Cheers!
Beyond lemonade
It’s summertime and if your house is like mine, you might have a few extra lemons around the house to use in your summer recipes. If you like the idea of homemade lemonade, I recommend this recipe, from the Simply Recipes website.

Image courtesy of Simply Recipes
However, we shouldn’t just think of lemons as cooking ingredients. Real lemons, their juice, peels and even their already squeezed halves can be a great non-toxic cleaning tools around our homes.
As part of our Greener Living Challenge, I’ve gathered together a list of many ways we can use lemons to clean responsibly (and cheaply!) around children, pets and adults. See if you can find a new use for this mighty citrus in your home:
- Remove soap scum and mildew: Apply lemon juice onto the surface of any soap scum or mildew. Let it sit for up to 2 hours. Rinse the area throughly with warm water. (No room ventilation required.)
- Clean your Tupperware: Mix lemon juice and baking soda into a simple paste and scrub those old food stains right our of your plastic food containers.
- Save your paintbrushes: Boil lemon juice in a pot on your stove top. Soak hardened paintbrushes in the boiling juice for 15 minutes. After 15 minutes, rinse the brushes and your pot in hot, soapy water. Allow the brushes to dry completely before putting them away.

Image courtesy of Wikipedia

- Protect your clothing: Dry lemon rinds in open air for 1-2 days. Fill sachet bags (like these) with the rinds and then hang them in your closets. The lemon rind will repel moths and keep your clothes smelling nicer than moth balls.
- Wipe out your microwave: Place one slice of lemon and 1 cup of water into a glass microwave-friendly bowl. Microwave for 30 second and then let the bowl sit in the microwave as the steam works its magic. Remove the bowl after a minute and wipe down the inside walls of the microwave.
- Perk up your laundry:Add one cup of lemon juice to the washer while washing your white loads, along with your usual laundry soap. Wash as normal. Your whites will look brighter.

Image courtesy of Wikipedia

- Return the sparkle to your glassware: Soak cloudy coffee pitchers, glasses and other similar items in a mixture of lemon juice and water. rinse thoroughly and then wash and dry as usual.
- Make your own metal polish: This solution works on stainless steel, brass and copper only. Make a simple paste of salt and lemon juice and scrub the tarnished surface. Allow the paste sit, untouched on the metal for 5 minutes. After 5 minutes, rinse the metal surface, dry thoroughly and polish as needed.
- Refresh the air in your home: Simmer 2-3 juiced lemons in 4 cups of water over low heat for a few hours to give your entire home a lemony clean scent. Citrus is also a powerful, energizing scent that can lift your mood.
Did you find a new way to use lemon around your home? What idea surprised you on this list? Do you a have another great way to use lemon that you’d like to share? Leave a comment!
Mood Board: Stylish studio living room
This room was designed for client who had just finished her post-graduate degree and was starting a new job. She chose to keep her living arrangements small in a nice new studio apartment. This allowed her to prioritize her student loans and travel extensively for her new career. The client wanted a cozy studio living room with some office space and furniture that she could live with for years…

The room color represented above was predetermined for this project by the apartment building owners, who prefer that their tenants do not re-paint. Fortunately, this light creamy color works very well with light in the room, so we happily set to work giving this living room some personality.
The client really loves earth tones, but we wanted to keep the room looking somewhat eclectic so she add personal items and new decor finds easily. First, we chose long, rich chocolate drapery panels to flank the tall windows. We echoed the chocolate tone in the area rug, but also made sure we chose a patterned rug to clearly define our living room seating area visually from the rest of the studio.
The love seat and club chair have clean modern lines in a neutral gray fabric which could work in any combination of spaces. This neutrality allowed us to accessorize the seating with a variety of pillows and a cosy throw in the client’s favorite color. The small coffee table is just the right scale for the seating area we created.
The open bookshelf was used twice in the room. First, behind the small sofa as a sofa table with baskets for storage, books and decor. (The client works in the education industry, so the moss-covered apple was a must for good luck in her new job.) The second bookshelf was used as media shelf for her tv/dvr and books across from the sofa. These classic shelves can easily be repurposed if the client ever moves.
We chose this double function dresser/desk to give the client more storage and an office space the can be easily closed away when she is entertaining. The desk chair can also join the conversation circle as additional seating. A new painting of a beautiful landscape above the dresser adds a pop of color to the creamy walls.
The area and task lighting was needed for this room to function as both living room and office. We kept the lamps feeling light in the room by choosing two see-through glass lamps for the sofa table and two slim floor lamps near the club chair and desk. This smaller visual lamp profile helps keep the small room feeling spacious.
Warm earth tones and soft, cool blues combine to define a cozy room within a new studio apartment. By organizing furniture choices to serve the client’s multiple needs, this living room is now ready for new work and entertaining.
Unique, affordable, comfortable living.
Wish you were here: free giveaway winner!
It’s time announce this week’s giveaway winner!
The winner will receive three antique postcards of Paris mounted and framed for their home or to give as a lovely gift. You can read how to make your own versions of this art here and here.

And the winner is: Matthew!
Matthew says he feels destined to see the breathtaking views of Switzerland after hearing about them from so many friends who have seen them in person. How lucky to have friends who can inspire you and give you great travel tips!
Congratulations, Matthew! I’ll be contacting you by email for your mailing address later today, so you can start enjoying your new art this week!
If you weren’t a winner today, don’t worry. The next giveaways is just two weeks away! You can follow CARO Interiors on Facebook and Twitter so you don’t miss a thing.
Did you see the new “Art for your Home” icon on the side bar? I’ve gathered all the ideas and tips we’ve discussed in one place to make it easy browse for your own art inspiration. There are already more posts in the works for this topic, so stay tuned!
Check back for another post this afternoon, too!
Have an idea for a gift you’d like to win? Leave me your idea in a comment!